What it does:
- Create Invoices or Purchase Requests: You have the ability to create a new Invoice or Purchase Request in ProcurementeExpress.com by simply scanning an invoice.
-
Upload Invoices: Start the process by uploading your digital invoices in a variety of formats, including PDFs, scanned images, or electronic documents.
- Email Invoices: Invoices can also be sent to a designated email address for automatic import and matching in ProcurementExpress.com, similar to when they are directly uploaded into the system.
-
Automatic Data Extraction: The system automatically extracts crucial invoice details like supplier information, PO numbers, and line items.
-
Matching: Once the information is extracted, our system intelligently matches it with corresponding purchase orders, ensuring accuracy and reducing the need for manual intervention.
-
Approval Workflow: After matching, the invoices are presented for your review and approval, making the approval process faster and more efficient.
How to use it:
To start using the Invoice Scan and Match feature, follow these steps:
Note:
- To create new purchase requests using the Scan and Match emailing feature, the email has to come from an existing ProcurementExpress.com user.
- To create new invoices, you can send them from any email address.
- Scan and Match emails will only work if the email has a subject and body, even if it's just one word.
- Email the document to your designated email address. This can be found in Company Settings (click your initials, top-right -> Company Settings -> Scan and Match).
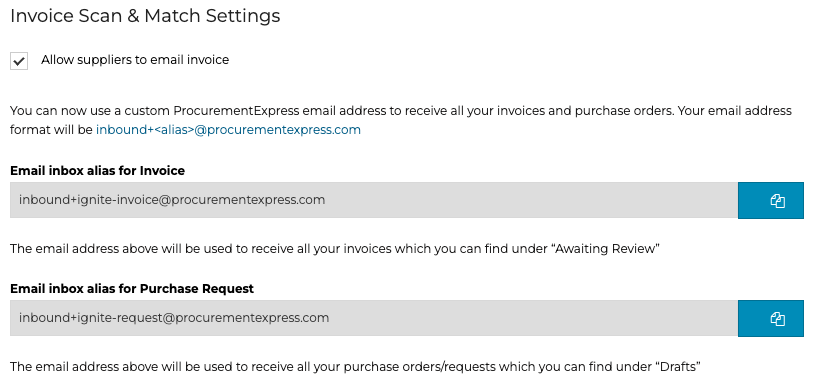
- On this setting screen, you'll see an address for the creation of invoices (that already have POs in the system) and also for purchase requests (if you want to create a new request using the invoice details).
- To make it even easier, you can set up a forwarder from an existing email address where your invoices are sent already.
- Pushing invoices to ProcurementExpress Scan & Match feature on Gmail.
- Pushing invoices to ProcurementExpress Scan & Match feature on Outlook (coming soon).
- Pushing invoices to ProcurementExpress Scan & Match feature on Office 365 (coming soon).
- Pushing invoices to ProcurementExpress Scan & Match feature for experts/administrators (coming soon).
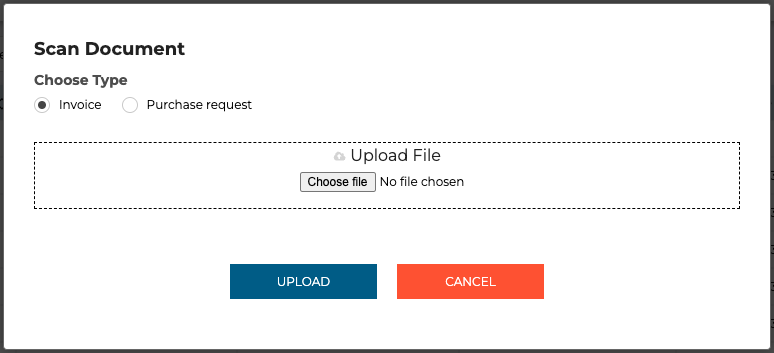
- Click on the Scan Document button. This can be found in multiple locations:
-
-
Top-right next to the New Purchase Request button

- Invoices tab -> Invoice Scan and Match
- Invoices tab -> Any of the sub-tabs -> Invoice Scan and Match
- A model will pop up
- Choose between Invoice or Purchase Request. This is the document that will be created from the scan. (So you can choose Purchase Request and upload an invoice PDF which will create a purchase request using the data on the invoice.)
-
Creating a purchase request using the scan document feature
- Tick Purchase Request as the document type
- Click Choose File and select the file you'd like to upload.
- Click the Upload button.
- Check that the fields are all correct. You can edit/change any of the fields on the draft purchase request.
- Fill in empty fields, like budgets and custom fields.
- Press Send. The new purchase request will follow the same lifecycle as a regular purchase request.
Creating an invoice using the scan document feature
- Tick Invoice as the document type
- Click Choose File and select the file you'd like to upload.
- Click the Upload button.
- Check that the fields are all correct. You can edit/change any of the fields on the draft invoice.
- Scroll down to find Purchase Orders. Check if the correct PO is suggested. Click on the PO number which will open the PO in a new tab.
- Only approved purchase orders will be available to be selected.
- If the PO number is on the invoice, it will always be matched to the invoice. If not, we'll use the other data to match it.
- Click on Link Items to PO
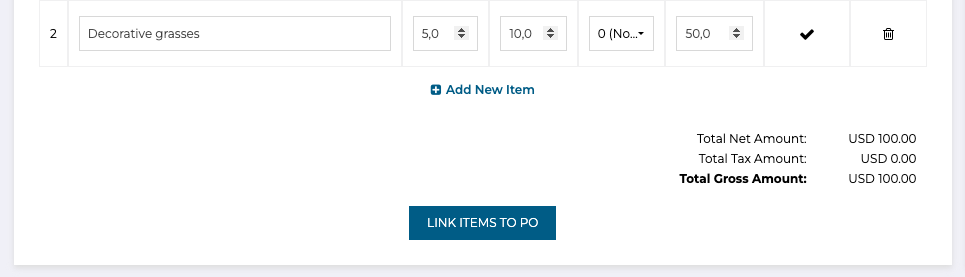
- If the PO is not correct, click on the Search button to show other relevant POs to link with.
- Tick the box next to the correct PO.
- Below that you'll notice Invoice Items. Find the drop-down arrow for each item on the right-hand side. Click it and make sure the correct line item is associated.
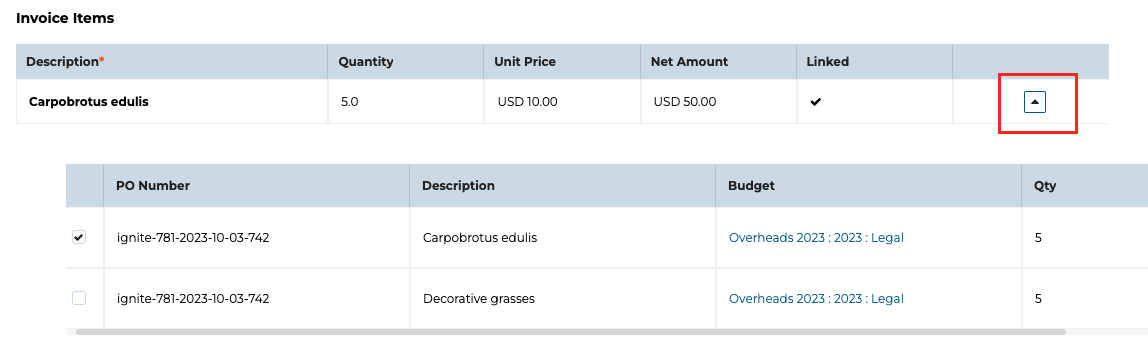
- Repeat for all line items.
- Click Link
- On the Review screen, click Save
Key Benefits:
The Invoice Scan and Match feature offers a host of benefits:
-
Time Savings: Automating data entry and matching processes saves valuable time, allowing your team to focus on strategic tasks.
-
Reduced Errors: Minimize human errors associated with manual data entry and matching, ensuring accurate financial records.
-
Cost-Efficiency: Streamlined processes reduce administrative costs and potential penalties for late payments or errors.
-
Improved Compliance: Stay compliant with company policies and regulatory requirements through automated matching and approval workflows.
-
Enhanced Visibility: Gain real-time insights into your invoice processing, monitor approvals, and track expenses more efficiently.
Support:
If you need further assistance, our dedicated support team is here to help. Contact us on the chat bubble (bottom-right), and we'll be happy to assist you.