Firstly, you need to go and find the unique email address that your ProcurementExpress.com has generated for you. You'll need to be logged in as a Company Admin to get this email address or ask your Company Admin for the address.
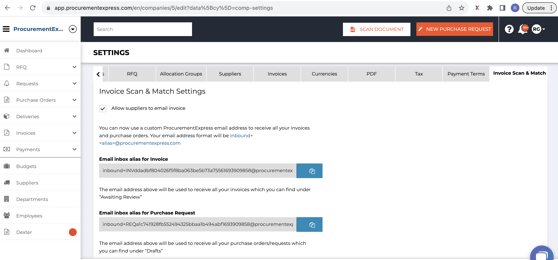
There are two email addresses, one for invoice forwarding and the other for forwarding purchase orders.
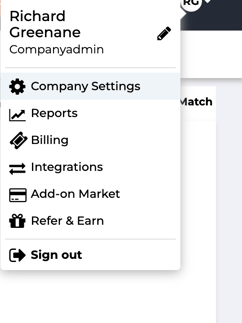
To get them, go to the company admin page by clicking on your initials in the top right and choosing "Company Settings".
From the Company Settings page you are then able to select the "Scan & Match" tab and you'll see the unique email addresses on the screen.
To redirect your emails from Gmail to an outside email address, you can set up email forwarding. Here are the steps to do it:
-
Log in to your Gmail Account: Open your web browser, go to the Gmail website (https://mail.google.com/), and log in if you're not already logged in.
-
Access Gmail Settings: Click on the gear icon (⚙️) in the upper-right corner of the Gmail interface, then select "See all settings" from the dropdown menu.
-
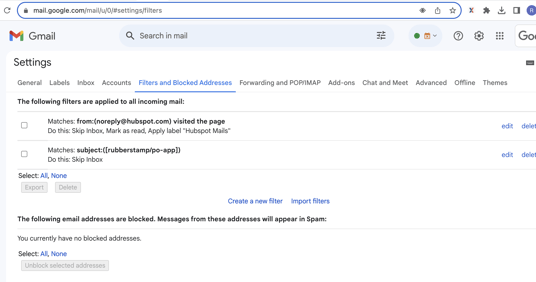
Go to Filters and Blocked Addresses: In the Gmail Settings page, click on the "Filters and Blocked Addresses" tab.
-
Create a New Filter: Scroll down to the bottom of the page and click on the "Create a new filter" link.
-
Set Filter Criteria: In the filter creation dialog box, you can define the criteria for the emails you want to forward. You can specify criteria such as the sender's email address, specific words in the subject or body of the email, or other relevant information.
-
Click "Create filter": After defining your filter criteria, click the "Create filter" button.
-
Choose Forwarding Option: In the next screen, check the box labeled "Forward it to" and then click on the dropdown menu to select or enter the outside email address where you want these specific emails to be forwarded.
At this point you need to use the long unique email address that you have gotten from the Company Settings page. -
Create Filter: Click the "Create filter" button to save your filter settings.
-
Confirmation: You'll see a confirmation message indicating that your filter has been created.
Now, Gmail will automatically forward emails that match the criteria you set in the filter to the specified outside email address. This allows you to selectively forward specific emails while keeping others in your Gmail inbox.
Please keep in mind that you can create multiple filters for different criteria if you want to forward various types of emails to different outside addresses. Additionally, periodically review and update your filters as needed to ensure they continue to work as intended.