Article Content:
2. How do I edit custom fields
2. The different types of input fields
3. Understanding custom field options
4. Access Level
What are custom fields?
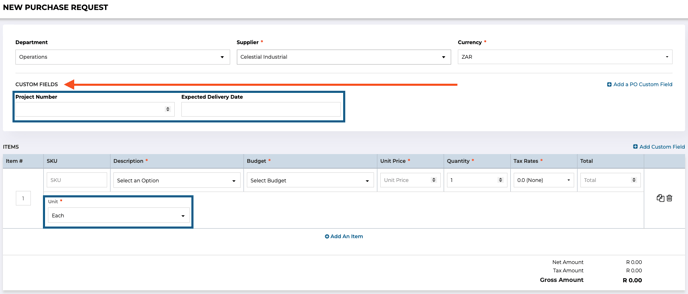
These are fields that you can add to your purchase order form. You can give them your own name, and change them to suit your needs.
How to add custom fields
- Click on your initials in the top right-hand corner
- Select "Company Settings" from the drop-down options
- Go to the "Purchase Orders" settings tab
- Scroll down until you see the "Custom Fields" section
- Click the "+ Add New Field" option under the "Purchase Order Custom Fields" Or under "Line Item Custom Fields"
- Enter the field's Name
- Select the Field type (Please see the "The different types of input fields" section on this article)
- Select the custom field options (Please see the "Understanding custom field options" section on this article)
- Select the access level of this field (Please see the "Access Level" section on this article)
- Click on "Save" once done
Note:
Purchase Order Custom Fields:
Fields where data can be added that are unique to the purchase order as a whole.
An example might be the payment method that will be used for the PO.
Line Items Custom Fields:
Custom fields that are added to each line item containing information that has to
be added for all the individual line items
How do I edit custom fields, or add new options to my drop down custom field?
To edit custom fields, click on your Initials in the top right, and then click on "Company Settings". Navigate to the "Purchase Orders" tab. Scroll down to see the "Custom Fields" section. Find the custom field that you want to edit, and click on the small pencil icon to the far right.

The different types of input fields
Date - Field used for adding dates, has a nifty date picker.
Drop-Down List - Add a drop-down list with predefined values that you could choose from
Label - Adds text but no field. (text that cannot be edited)
Number - Adds a field that only accepts numbers and not text
Telephone Number - Adds a field that can contain telephone numbers
Text Box - Used for making notes/memos (Longer Text)
Text Input - Used for making short notes Limited at 255 characters
Web Link - Fields for inserting links
Yes/No - Adds a checkbox, where a checked box means "Yes" and an empty unchecked box "No"
Understanding the different custom field options
Required Fields
All required fields have to be filled in to be able to send the purchase order off for approval.
Active
Enables and Disables the custom fields.
Editable after approval
This setting controls whether the field can still be edited after the purchase order has been approved.
Access Level
What user roles will have access to see and edit the custom fields? You can select from the 3 preset options in the drop-down list.
- Everyone (Team Members, Approvers, Finance and Company Admins)
- Approvers and Finance
- Finance Only
Available on PO list screen
(This is only applicable to Purchase Order Custom fields)
Here you can choose whether the field should be displayed on the purchase order listing screen and available for bulk edit.
Displayed on the PDF
Toggles whether the fields are being displayed on the PDF version of the Purchase Order.
You can also select if you need the field to always display or only display when that field has information in it.

Access Level
With this setting, you decide who is able to see the field
Everyone - Every user will be able to see this field regardless of their user roles
Approvers and finance - Only users that have the Approver and Finance user role will be able to see this field
Finance Only - Only users with the Finance user role will be able to see this field
Note: A custom field can only be a required field if the access level is set to "Everyone" as team members are the users that have the ability to create a PO, and if they are not able to enter a required field they will not be able to complete the PO.
Still have a few questions? Use the Live Chat icon in the bottom right corner, alternatively send an email to support@procurementexpress.com to get in touch with one of our Support Representatives.
Have a feature suggestion? We'd love to hear from you! Add your feature suggestion on feedback.procurementexpress.com.